

Understanding how to build an AR-15 from scratch can be a daunting task, but with the right knowledge and guidance, it’s entirely achievable. This guide will provide the necessary expertise and guidance to assemble your own AR platform rifle, providing you with the knowledge you need for a basic AR build.
We’ll begin by discussing the importance of having a quiet workspace with sufficient light and considering different aspects like purpose and power when building your AR-15. We’ll then delve into the essential components needed for assembling an AR-15, including stripped lower receiver assembly, trigger unit & bolt carrier group installation, as well as barrel selection criteria.
You’ll also learn about buffer tube installation and front takedown pin addition in detail. Furthermore, we’ll walk you through upper assembly part inclusion and explore various muzzle device options available for your custom-built firearm.
To ensure success in this endeavor of learning how to build an AR-15 rifle at home or elsewhere safely and efficiently; we’ve included tips on avoiding common mistakes highlighted by experts like Alex Bohl. Finally, yet importantly, we stress buying quality parts from reputable companies for a successful build followed by range testing and sight tuning once assembled.
Table of Contents:
- Understanding the Basics of Building an AR-15
- Essential Components for Assembling an AR-15
- Lower Receiver Assembly Process
- Buffer Tube Installation and Front Takedown Pin Addition
- Upper Assembly Part Inclusion and Muzzle Device Options
- Avoiding Common Mistakes While Building an AR-15 Rifle
- Building an AR-15? Get Quality Parts from Reliable Companies.
- Finalizing Your AR-15 Build With Range Testing And Sight Tuning
- FAQs in Relation to How to Build an Ar-15
- Conclusion
Understanding the Basics of Building an AR-15
Creating an AR-15 rifle can be a thrilling endeavor for those with interests in shooting sports, home defense, and hunting. Let’s cover the basics before we get started.
The Importance of a Quiet Workspace With Good Lighting
A quiet workspace with plenty of light is key when building an AR-15. It’s like creating a masterpiece, but with guns. No distractions, no squinting at tiny parts.
Considering Different Aspects: Purpose and Power
- Purpose: What’s the plan for your rifle? Target shooting or hunting? It makes a difference in choosing the right components. Think barrel length, caliber, and other fancy features.
- Power: How much oomph do you want behind each shot? If you’re into long-range shooting or hunting varmints, go for high-power rounds like 5.56x45mm NATO. Boom.
Oh, and don’t forget to make sure your upgrades fit well with the furniture (not the couch kind). Incompatible parts can lead to discomfort or even malfunctions. Nobody wants that, right?
Essential Components for Assembling an AR-15
To assemble your own AR-15 rifle, you’ll need a few key components. These parts form the basic structure of your firearm, onto which you can add accessories based on your preferences or needs.
The Role of the Stripped Lower Receiver
The stripped lower receiver is the heart of any AR-15 build. It’s where all the other components attach and interact. This part also makes an AR-15 legally a firearm, so get it from a federal firearms license dealer (you know, a reputable source like your local gun store).
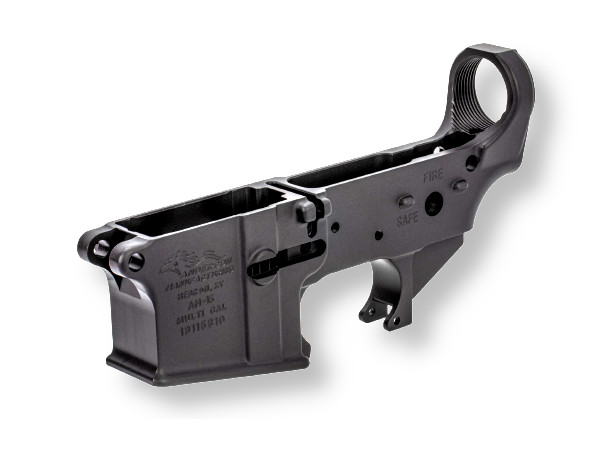 Anderson Manufacturing AR-15 Stripped Lower Receiver
Significance of the Trigger Unit & Bolt Carrier Group
- Trigger Unit: The trigger unit controls when and how your weapon fires. A quality trigger provides consistency and accuracy while shooting.
- Bolt Carrier Group (BCG): This component houses the firing pin, cam pin, bolt extractor, and gas key, which are crucial for cycling rounds as you fire.
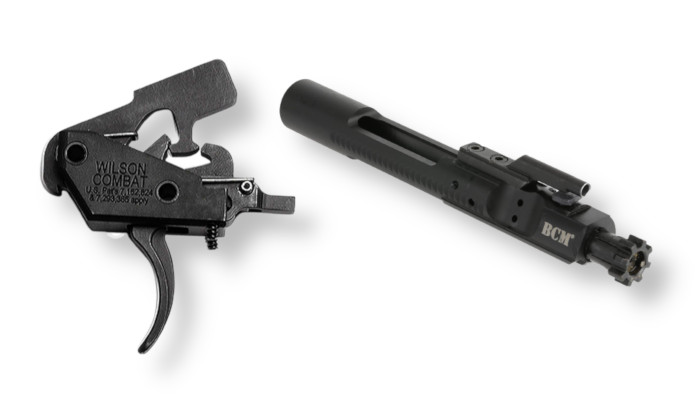 AR-15 Trigger Unit and Bolt Carrier Group
Importance & Selection Criteria for Barrels
Your choice of barrel significantly impacts the performance and legality of your AR-15. Barrels come in various lengths and profiles, each offering unique advantages depending on their intended use, such as home defense or hunting. Remember to consider local laws before deciding on barrel length.
Lower Receiver Assembly Process
Constructing an AR-15 rifle necessitates exactness and forbearance. The first step in this journey involves the assembly of the lower receiver. This component serves as the foundation for your firearm, housing several crucial parts including the trigger mechanism and magazine well.
Steps to Install Magazine Release
The magazine release installation is a piece of cake. Grab the release button, spring, and connector. Stick the spring into the designated hole on one side of your lower receiver. Then, thread the magazine release button from the opposite side until it’s flush with the surface. Finally, screw the connector onto the exposed end of the spring to secure everything in place.
Procedure to Attach Hammer Safety-selector Switch Detent Spring Grip
Time to attach the hammer safety-selector switch detent spring grip. Slide the safety selector through the provided slot and insert the detent, a small metal piece, followed by the spring into their respective holes within the grip area. Once aligned correctly, secure them using the supplied screws. Remember, tight but not overly tight, unless you want to strip threads or damage parts. Ouch.
Avoiding common mistakes during assembly, like cross-threading or over-tightening, can save you time and frustration down the line. It’ll make the entire building experience more enjoyable and rewarding, leading to better overall performance of your newly built weapon. And that means happier shooters all around.
Test each piece post-installation before progressing to the following build stage is suggested for optimal functioning. This reduces the chances of encountering issues later on when firing rounds under real-world conditions. Confidence in the performance of each part is essential for optimal efficiency, reliability, and accuracy when firing rounds with an AR-15 rifle.
Making sure you correctly attached the hammer safety-selector switch detent spring grip is crucial to a well-built and well-performing custom AR-15.
Buffer Tube Installation and Front Takedown Pin Addition
Time to spruce up your AR-15. Let’s tackle the buffer tube and front takedown pin. These bad boys are crucial for a functional and versatile firearm.
How to Thread the Castle Nut onto the Buffer Tube
First things first, you gotta thread that castle nut onto the buffer tube. Precision is key here, folks. We want everything snug and stable. Don’t forget to install a buffer-retaining detent before tightening that nut. It’s like the cherry on top… but for your gun.
Adding the Front Takedown Pin Like a Pro
Now, let’s talk about the front takedown pin. This little guy adds versatility to your AR-15, so you can customize it to your heart’s content. With enough practice, the front pivot pin installation will become second nature. Need some guidance? Check out this guide on installing an AR-15 front pivot pin.
Remember, don’t mess up the torque. Incorrectly tightening the parts can cause malfunctions or damage, something we want to avoid for a well-functioning and durable rifle. We don’t want that, do we?
In a nutshell, getting these components installed correctly is crucial for a smooth-operating and long-lasting rifle. Take your time, be patient, and pay attention to the details. Trust me, it’s worth it.
Upper Assembly Part Inclusion and Muzzle Device Options
The upper assembly is like the brain of your AR-15 build. It’s got all the important stuff, like the forward assist, spring pin, ejection port cover, and charging handle. Plus, it’s got the barrel, which is like the long arm of accuracy and range.
Steps for Upper Assembly Inclusion
Let’s get this upper assembly party started. First, pop in the forward assist. Then, slide in the spring pin and attach the ejection port cover. Time to bring in the charging handle, so you can load and unload like a boss. Finally, make sure that the barrel is snug and aligned, so you don’t have any misfires or jams.
Options for Muzzle Devices
Muzzle devices are like the cool kids of your AR-15 rifle. They help reduce recoil and muzzle rise, making shooting a breeze. Check out these two options:
- Muzzle Brakes: These bad boys redirect gases sideways, so you can keep shooting like a champ. Perfect for competitive shooters who need lightning-fast follow-up shots. Learn more about Muzzle Brakes here.
- Flash Hiders: Say goodbye to blinding flashes. These sneaky devices hide the flash, so you can see what you’re shooting at. Great for rapid fire or low light conditions. Discover more about Flash Hiders here.
Avoiding Common Mistakes While Building an AR-15 Rifle
Constructing an AR-15 firearm necessitates exactness and focus on the details. Even experienced builders can make mistakes. Here are some errors to avoid:
Alex Bohl’s Key Points on Common Errors
Alex Bohl of Trajectory Arms, an expert in firearm assembly, warns about potential pitfalls when building an AR-15. Under-torquing castle nuts is one such mistake that could cause the firearm to come apart during use. Ensure everything fits snugly and securely using knurled set screws and Loctite.
- Under-Torquing Castle Nuts: This mistake can lead to serious safety issues, causing your gun to disassemble while firing. Always double-check this part for proper fitment.
- Failing to Use Knurled Set Screws and Loctite: These tools keep components tightly secured, enhancing performance and durability.
- Rushing the Build Process: Take time with each step to avoid overlooked details or improperly installed parts that could affect functionality or safety.
In addition, Alex Bohl emphasizes the importance of buying quality parts from reputable companies. These companies offer complete builds and save customers money by testing the parts they send. It’s crucial to do research and invest in quality components.
To sum up, avoiding these common mistakes improves the longevity and performance of your newly built weapon. Patience pays off.
Building an AR-15? Get Quality Parts from Reliable Companies.
When it comes to building an AR-15, don’t skimp on quality parts. Trustworthy companies like Trajectory Arms know their stuff and will save you from future headaches.
Why Quality Components Matter
Not only do reputable companies offer complete builds, but they also test every single part they sell. This means you’ll get components that perform like champs and last for years.
Buying subpar parts is a recipe for disaster. You don’t want malfunctions, poor performance, or safety hazards. So take your time, do your research, and invest in top-notch parts.
Here are some tips for buying AR-15 parts:
- Check Reviews: Don’t just take their word for it. See what other customers have to say about the product and the company.
- Budget Wisely: Don’t be fooled by cheap deals. Price matters, but it’s worth investing in something of good quality.
- Contact Customer Service: A company with good customer service is a company you can trust. If you need any assistance, please don’t hesitate to contact us.
In a nutshell: take your time, do your homework, and buy high-quality components from reliable sources. Your AR-15 will thank you.
Finalizing Your AR-15 Build With Range Testing And Sight Tuning
So, you’ve put together your AR-15. Now it’s time to take it to the range and see if it’s as awesome as you think it is. Plus, you’ll get to play with sights and stuff. Fun.
First things first, do a function check. Load some rounds, shoot ’em, and make sure they come out the way they’re supposed to. If anything goes wrong, it’s troubleshooting time.
Now, let’s talk about sight tuning. Whether you’re into iron sights or fancy optics, getting them dialed in will make you a sharpshooter. Set up targets at different distances and adjust until you’re hitting the bullseye like a boss.
Check out different kinds of ammo, too. BulkMunitions has a sweet selection for your AR-15. Different bullet weights can make a big difference in how your rifle performs. Try different types of ammo to discover the one that works best for you.
- Ammo Type: Bullets come in all shapes and sizes. Try out a few to see which ones fly straighter out of your barrel.
- Ammo Quality: Not all ammo is created equal. Go for the good stuff if you want consistent velocity and accuracy.
By following these steps, you’ll get your AR-15 running in top condition and have a blast while doing it. Happy shooting.
FAQs in Relation to How to Build an Ar-15
Can a beginner build an AR-15?
Yes, even beginners can build an AR-15 with the right tools, quality parts, and detailed instructions like those found in this guide.
How much does it cost to build an AR-15 from scratch?
The cost of building an AR-15 from scratch typically ranges between $500 and $1,000, depending on the component choices. For more details about the costs involved, check out this comprehensive breakdown.
Is it cheaper to build an AR yourself?
Yes, it’s generally cheaper to build your own AR-15 because you can choose each part individually, potentially saving money compared to buying a pre-assembled model.
How long does it take to build an AR-15 from scratch?
It takes approximately 5 hours for a beginner to build an AR-15 following step-by-step instructions, but the time may vary depending on individual skill level.
Conclusion
This beginner’s guide has everything you need to know about building an AR-15, from picking the right parts to avoiding rookie mistakes.
Get ready to assemble your lower receiver, install the buffer tube, add the front takedown pin, include the upper assembly, and choose the perfect muzzle device.
Remember, quality parts from trusted companies are key to a reliable build, so don’t skimp on that.
Once you’re done, it’s time for range testing and sight tuning to make sure your AR-15 is ready to rock.